
Quart Coat by Pauline Alice
Hello There Friends,
It was my great privilege to be selected as a pattern tester for Pauline Alice’s newest pattern release: the Quart Coat.
Let’s get the nitty gritty out of the way first. Yes, as part of the pattern testing process the draft pattern was provided to me free of charge (in exchange for my honest feedback on the pattern), and Pauline is sending me a final version (at time of writing it is in the post)! I paid with my own money for all the fabrics and notions. Let me also be clear that you won’t find me volunteering to test every new indie pattern that comes out. I have genuinely admired Pauline’s designs for some time, and was very pleased when she recently expanded her size range. I think her designs are unique, a little more challenging to sew and feminine. All the following opinions are my own.
Warning: picture heavy post (a reflection of how proud I am of this coat :-))
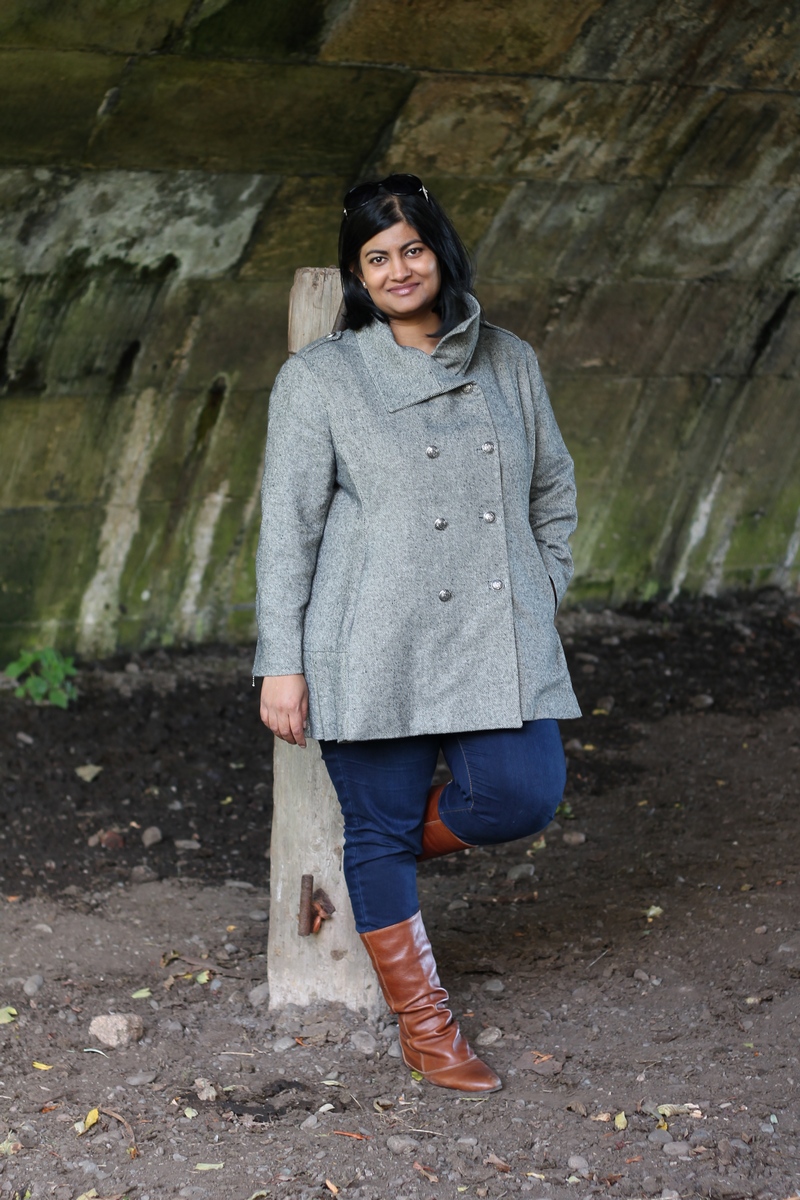
The Quart Coat is described as a “double breasted, semi-fitted coat with high stand-up collar, inseam pockets, long sleeves with zipped cuffs inspired by military outerwear”. It also features epaulettes and a pleated skirt detail at the side.

Quart Coat by Pauline Alice

Quart Coat by Pauline Alice

Quart Coat by Pauline Alice
Things you should know about this pattern:
- It is aimed at intermediate – advanced sewers. Sewing any winter coat is a considerable investment, both in terms of time and money. I worked on this coat for 12 days, spending around 2 hours a day, with one day spending around 5 hours. And that’s without any pad stitching.
- Following on from the point above, the instructions have you interface all the major areas of the jacket. This includes fusing a back stay, all the hems, the zipper vents, the seams where the pockets are inserted, the collar, yoke and the sleeve heads and armholes.

Quart Coat by Pauline Alice: interfacing hems/ armholes etc of pattern pieces.
- The pattern includes a 2 piece sleeve.
- The pattern includes some separate lining pieces, and the back lining piece includes a pleat. So what I am saying to you is, this is an extremely well thought out and drafted pattern (at least, IMHO – and you should all know me by now, I speak as I find!)
- The pattern runs to 45 pages. I would normally avoid a PDF that big, but it went together smoothly enough. I found that taping sections together a cutting out pieces as they came together was easier than trying to tape all 45 sheets together in one go.
- You do have to draft the piece for the kick pleats at the sides of the coat yourself. I managed this fine; you just have to take your time and follow the instructions.

Quart Coat by Pauline Alice: side pleat detail
Details of my specific coat:
- The outer fabric is a wool tweed. The lining is a heavy faux silk.
- I made bound buttonholes.

Quart Coat by Pauline Alice: buttons and bound buttonholes
Here you can see the inside of my coat. The whole of the front is interfaced, and you can see the reverse side of my bound buttonholes. You can also see the sleeve heads I inserted using the method described in Jackets for Real People, which involves using fleece. This is probably my one regret with this jacket; next time round I would make proper sleeve heads using the sleeve pattern and probably make my own shoulder pads. I also think the jacket would have perhaps benefitted from a chest shield? Ah, hindsights a great thing.

Quart Coat by Pauline Alice: inside coat
- In terms of pattern modifications I shortened the sleeves by 2.5 inches. If I was making this again I would probably shorten by only 1.5 inches: I didn’t allow for the shoulder pads and should have. I also ended up removing around 2 inches from the pattern in a wedge from front to centre back, tapering up to 2.5 inches at the centre back (thereby effectively also doing a sway back adjustment). Again, if I was making this again I would probably add maybe 0.5 – 1 inch back to the centre front as I feel it is slightly shorter there.
- I managed to bag the lining almost entirely by machine (about 90%), by reaching up inside the coat and stitching around the pleats before turning the coat inside out and bagging the lining. 10% of the lining was then stitched by hand.

Quart Coat by Pauline Alice – lining detail
- I chose to cut the front pocket pieces and both sides of the epaulette from outer fabric. I also understitched the pockets. I had to make the zip vents slightly larger than the pattern instructed (approx. 0.5 cms) (again, at time of writing I am not sure if this has been changed in the final pattern or not, or even if any other testers had to make this change).
Some detail shots:

Quart Coat by Pauline Alice – Zip vent

Quart Coat by Pauline Alice – hanging chain

Quart Coat by Pauline Alice – epaulettes
This coat was actually sewn up more than a couple of months ago and I have already had loads of wear out of it. It is very comfortable and I love the stylish details like the epaulettes, the side pleats and the zippered vents. I could also see this pattern being sewn up in something like a cotton twill for a lighter weight spring/ summer jacket. All in all, I really recommend this pattern. It is a unique indie pattern which is an absorbing sew with well thought out details and instructions. Bravo Pauline!

Quart Coat by Pauline Alice
Quart Coat by Pauline Alice

Quart Coat by Pauline Alice
I have to say a big thank you to my sister for taking the photos too.
Have a great week everyone!


Gorgeous coat! I love your expert attention to detail: the pleated sides, bound button holes, zippers on sleeves, etc. You really did the pattern maker a great favor with your review and wonderful pictures. Lovely choice of lining too.
Thank you so much zibergirl!
Manju, you should be proud of this coat. It is DIVINE! The zip vent on the sleeves are a great detail. Of all the details of the coat, I like that one the most.
Thanks alicia.
The coat looks fantastic on you! You did an amazing job on all of those details!!!
Thanks Carolyn.
What a nice-looking coat! I really like that stand up collar, and the red lining is perfect.
Thanks!
Pingback: Pattern Sighting | Lin3arossa
Your coat is absolutely gorgeous! I love the details in the pleats and the zips on the sleeves. Bravo!
Thank you Andi.
Amazing Coat! Love the detail shots, and the over feel – so fun and flirty, but still chic! 🙂
Thanks Sally. You should definitely try it out!
looks great, what a good choice of fabric, very chic! now I want to get going on making one. beautiful lining too, fun!
Download the PDF Beth; you could start right away 🙂
You did a great job on this coat. Thanks for the review too. It looks great on you!
Thanks Roberta.
Wow! That is a fabulous coat, so many lovely design details – and beautifully executed, as always. You should be proud 🙂
Thank you Fiona.
WOW~~~ Gorgeous!!!
Thanks Kat.
Wowsers! Your coat is absolutely gorgeous! And the photos are great too.
Thank you Lynne. Sisters are useful sometimes 🙂
Wow!
Thanks pennylibrarian.
You’ve made such a beautiful coat with the pattern Manju! I’ve already told you: this is amazing! Thanks so much for your help.
And just so you know, I added the pleat detail on the pattern pages, both printed and PDF versions (that’s why testers are so great!).
Thanks Pauline and that’s great to hear you included the pleats in the pattern. It makes it perfect now! 🙂
I really love this coat. You have done a great job… and I think I need this pattern. I love the style, it’s feminine without being too girly, it’s got an edge to it.
Thanks Liz. Yes I can see you wearing this coat and its a great sew.
Lovely coat on you, love the sleeve zips and especially the side pleats! And very well made too!
Thanks Helen.
Oh my goodness! I spotted the new pattern on her blog and really like it… I am so excited to see you sewed it up and how it all worked out. Love the materials. It looks really great on you. The details are pretty terrific and distinctive from other coat patterns.
Thanks Kathy. Yes I think the details really set it apart.
Wow! It looks amazing. It has so much detail in it. I love the pleats at the side. 💝
Thanks Amanda!
I love how you say it as you see it. Your coat is beautiful. It’s lovely to look at and your finishing skills are awesome.
You’re right – Pauline drafts really lovely and wearable patterns.
Thanks Marie.
This is fantastic!!! SSB https://facebook.com/sassysewingbees
Thanks sassy T.
This looks fabulous Manju! I love everything about it. Your bound buttonholes are so neat. I’ll definitely be adding this one to my “to sew” list for next winter – better finish the coat I’m working on this year! – it’s a great design. Can I ask where you got your hanging chain from?
Hi sam. I bought the hanging chain from my local craft/ haberdashery store in their jewellery dept. Its quite light weight so I wasn’t sure it would hold but I have used it in my last 3 or 4 jackets and it’s been brill. I have got some more substantial chain off ebay but that seller doesn’t seem to be selling it anymore. I got it to weight my (not started!) chanel style jacket. Anyway, if you search for the curb chains they use for bag handles that also would work for hanging chains. Hope that helps.
Wow! you did a fabulous job on that coat. Excellent craftmanship.
Wow…I LOVE that coat!!!!!!!!!!!! Beautiful!!!!!!!!!!!!!!!
What a wonderful coat, you have done a great job. Love the bound buttonholes and the pleats. Well done!
Your coat is legit stunning. Really really beautifully done.
Your coat is really amazing and I found your pattern overview interesting to go through.Astonishing job bravo!
No wonder you are proud of this coat you have done a beautiful job. The pleats make the coat extra special. You should get you sister to take all your photos she has done a wonderful job
Gorgeous job – you should be proud. Love all the detail, especially that ruby red lining & those pleats! *faint* xx
Pingback: Pauline Alice Eliana Dress Review and Pauline Alice Quart Coat Pattern Giveaway | sewmanju
Pingback: McCalls 7058: DIY Basket Weave Wool Winter Coat | sewmanju
Pingback: Linen Quart Coat | Nikki's Stitches
Thanks for this post! Your coat looks fab. Can I ask for more info on how you lined your pleats? The pattern has me putting pleats in the outer and inner layers separately then joining it all together but that will twist my pleats if they’re not sewn down already interleaved? It looks like you lined your pleats first then added the lining after – and the finish is far better. How did you attach your lining to the lined pleat panel after the fact? There is no mention of this anywhere in the pattern! 😦 Thanks!
Hi, I’m really sorry but I made this pattern 6 years ago and don’t remember fine details! I think I made the pleats in the outer fabric and the pleats in the lining fabric and then bagged the lining out by sewing as far as I could along the bottom of the coat/ lining with right sides together before turning it out the right way and finishing with some hand sewing. Sorry I can’t recall exact details at this time.